
Unleash the Power of Drupal's Stripe Webform Payment Module
A Deep Dive into Advanced Configurations & Customizations

Hodba Khalaf on 19 June, 2023
Drupal stands tall as one of the most reliable Content Management Systems (CMS), with a rich set of features that site builders and developers love. Stripe, known for its solid and easy-to-use online payment solutions, is a go-to for many in the industry. Now, imagine combining Stripe's power with the flexibility of Drupal’s Webform module. This duo can take your eCommerce capabilities to new heights! In this guide, we’ll dive deep into the advanced configurations and customizations within Drupal's Stripe Payment module using YAML. Whether you’re a veteran Drupal developer or just getting your feet wet, this guide is your key to unlocking a world of eCommerce possibilities.
Prerequisites
Before diving into the advanced configurations and customizations within Drupal Stripe Webform Payment module, it is essential to ensure that you have all the prerequisites in place. This will facilitate a smooth and efficient setup process. Here are the prerequisites that you should have in place:
- Stripe Account: You need to have an active Stripe account. If you don't have one, you can sign up on the Stripe website. This account will be used to process payments and manage transactions.
- Stripe API Keys: Ensure you have your Stripe API keys ready. These will be required for configuring the connection between your Drupal site and Stripe. You can find these keys in your Stripe Dashboard under Developers > API keys.
- Drupal Stripe Module: It’s essential to have the Drupal Stripe Module installed and configured on your Drupal website. The Stripe module integrates Stripe payment processing functionality into your Drupal site. You can download and read more about the Drupal Stripe Module on its official Drupal page: Stripe Module.
- Drupal Webform Module: The Drupal Webform module provides you with the ability to create forms, surveys, questionnaires, and other types of content that can be integrated with Stripe for payment processing. If you don't have this module, you can download it from its official Drupal page: Webform Module.
- Stripe Webform Payment Module: This module is an integration of Stripe with the Webform module, allowing you to process payments within the forms you create using Webform. You need to install this module and read through the description for more information on how it integrates with Stripe. Visit the official Drupal page for the Stripe Webform Payment module: Stripe Webform Payment.
- Familiarize Yourself with Drupal Webform-Stripe Integration Options: It’s beneficial to understand the different options available for integrating Stripe with Drupal Webforms. A comprehensive comparison of Drupal webform-stripe integration modules is available at this link. This will give you insights into which module or integration suits your needs best.
Once you have these prerequisites in place, you’re all set to harness the powerful combination of Drupal and Stripe for your payment processing needs. Proceed through this guide with the confidence that you have everything you need to get started.
Basic Configurations
The basics of Stripe Webform Payment Module
When configuring the Stripe Payment Module in Drupal, you'll encounter various functionalities. Let's understand what each of them does:
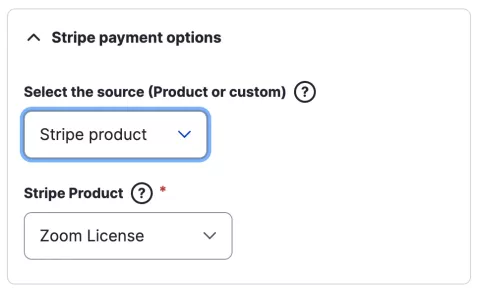
Stripe Payment Options
- Select the Source: This functionality determines where the payment should be drawn from. It offers two options:
- Stripe Product: By choosing this, you are linking an existing product from your Stripe account to the form. This is ideal when you have products already set up in Stripe and want to utilize them directly.
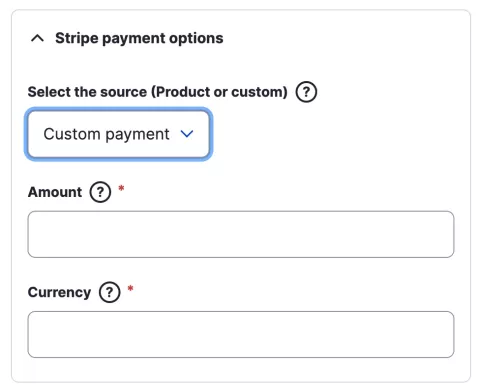
- Custom Payment: This allows you to define specific payment details right on the form. It's perfect when you have a one-off payment or if the payment details don't fit into any of your existing Stripe products. Why Use It?: It offers flexibility in payment processing by either utilizing pre-existing products or custom-defined payment information.
- Amount (for Custom Payment): If you opt for Custom Payment, you’ll specify the amount here. It’s important to note that the amount should be in a decimal format (like 100.00 for 100). Why Use It?: This field gives you the ability to set a specific charge amount for the payment.
- Currency (for Custom Payment): This is where you define in which currency the payment should be processed. It should be entered as a three-character code, such as USD for US Dollars or EUR for Euros. Why Use It?: This ensures that your charges are processed in the correct currency.
- Stripe Product (for Stripe Product): If you choose Stripe Product as the source, you’ll need to pick which product you want to link from a dropdown list. Why Use It?: It streamlines the payment process by allowing you to select from products already available in your Stripe account.
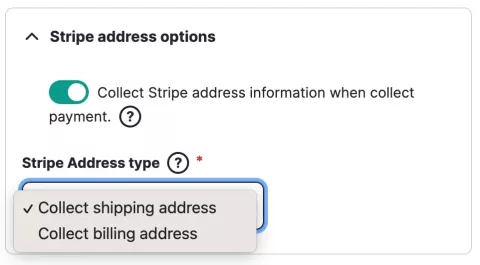
Stripe Address Options
- Collect Stripe Address Information: This is a choice you can make if you need to gather address information from your customers during the payment process. Why Use It?: It’s extremely useful for transactions where shipping or billing addresses are essential, for instance, in the sale of physical goods.
- Stripe Address Type: If you’re collecting address information, you need to specify what type of address you’re collecting: shipping or billing. This helps to clarify the purpose of the address. Why Use It?: Understanding whether an address is for shipping or billing helps manage how the collected information is used.
These functionalities are central to configuring how payments are processed using the Stripe Payment Module in Drupal. They are designed with flexibility and usability in mind, catering to a variety of payment scenarios.
Advanced Configurations
The Advanced Configurations To Unlock The Power
When configuring the Stripe Payment Module in Drupal, you'll encounter various functionalities. Let's understand what each of them does:
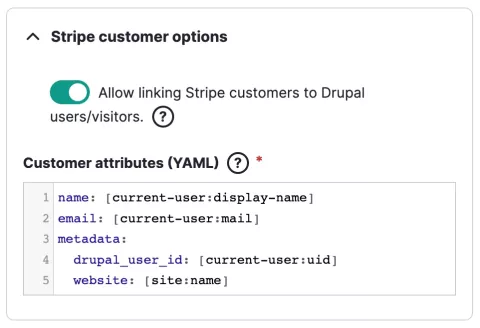
Stripe Customer Options
This section of the Stripe Payment Module enables you to manage Stripe customer data. Let's dive into the functionalities available under the "Stripe Customer Options" and understand their purpose:
Allow Linking Stripe Customers to Drupal Users/Visitors
This checkbox option allows you to create a link between Stripe customers and Drupal users or visitors. By enabling this option, you are essentially organizing the payments made by specific users or visitors by mapping them to Stripe customers.
- Centralized Payment History: It helps in keeping a centralized history of payments made by each customer.
- Recurring Payments: Facilitates easier handling of recurring payments.
- Customer Management: Easier management of customer data.
- Customized Communication: Allows for customized communication with the customer based on their payment history.
- Use Case Example: For example, when you want to group all payments of a user under one Stripe customer and activate Stripe's customer portal on your website so the user can manage their subscriptions and payments.
Stripe Customer E-mail
This is where you enter the email address of the customer. Stripe can use this email address for sending invoices generated by Stripe. You can also use tokens.
Advanced Use: This could be used in conjunction with Stripe’s automatic email receipts. Every time a payment is successful or a subscription changes, Stripe can automatically send an email notification to this address.
Customer Attributes (YAML)
This is a more advanced feature where you can add attributes to the Stripe customer in YAML format. This usually includes metadata of the user ID.
Metadata is useful for storing additional, customizable information with the customer. This can be used for a more robust data set about your customers.
Linking metadata can have various benefits such as:
- Enhanced Tracking: It allows for enhanced tracking of how a customer interacts with your site.
- Customized Experiences: Helps in creating more personalized customer experiences.
- Data Integrity: Ensures consistency between Drupal user data and Stripe customer data.
Use of Keys in Metadata: When using customer attributes, the keys that are used to retrieve the customer are:
- The 'email' key.
- The elements inside the 'metadata' array. This is particularly useful for advanced use cases where precise data points are needed.
One good example of using metadata is to insert the Drupal user ID, username, and website domain name as identifiers so you can recognize the source website and users on the Stripe customer base. Also, it can be used with the Stripe Customer Portal module to allow users to manage their Stripe payments.
Advanced Use Cases (Stripe Customer API): By referring to the Stripe Customer API, you can find more advanced use cases such as:
- Tax Information: Adding tax IDs to customers for use in tax reporting.
- Preferred Languages: Storing preferred languages for sending localized email receipts.
- Custom Labels: Attaching custom labels to customer objects for easier search and filtering.
Understanding and effectively utilizing the "Stripe Customer Options" can lead to more efficient customer data management and a more tailored experience for your users.
Stripe Appearance Options
This section of the Stripe Payment Module allows you to customize the appearance of Stripe elements such as input fields, buttons, and tabs. Here’s how you can harness the various features available under the "Stripe Appearance Options":
theme
The theme attribute lets you apply a predefined set of styles to the Stripe elements. Themes are meant to provide a consistent look and feel that matches common styling patterns.
Simple Usage: For a quick and simple application, you can just specify the name of the theme. For instance:
theme: 'stripe' # Stripe Default themetheme: 'flat' # Flat theme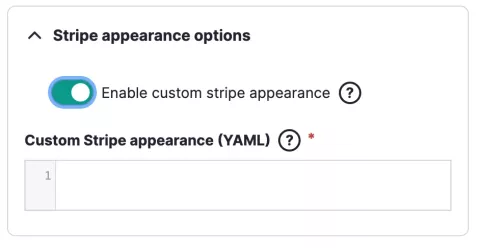
Variables and Rules
Variables are used to define custom properties that can be utilized in the rules. This is particularly useful when you want to maintain a consistent design language throughout the Stripe elements, while Rules allow you to apply custom styles to specific elements. This is where you leverage CSS to tailor the appearance of your Stripe elements.
Here are some ready examples from Elements Appearance API converted to Yaml format and ready to be used in the module:
theme: 'stripe'
variables:
  fontWeightNormal: '500'
  borderRadius: '2px'
  colorPrimary: '#f360a6'
  colorIconTabSelected: '#fff'
  spacingGridRow: '16px'
rules:
  '.Tab, .Input, .Block, .CheckboxInput, .CodeInput':
    boxShadow: '0px 3px 10px rgba(18, 42, 66, 0.08)'
  '.Block':
    borderColor: 'transparent'
  '.BlockDivider':
    backgroundColor: '#ebebeb'
  '.Tab, .Tab:hover, .Tab:focus':
    border: '0'
  '.Tab--selected, .Tab--selected:hover':
    backgroundColor: '#f360a6'
    color: '#fff'
theme: 'none'
variables:
  fontFamily: 'Verdana'
  fontLineHeight: '1.5'
  borderRadius: '0'
rules:
  '.Input, .CheckboxInput, .CodeInput':
    boxShadow: 'inset -1px -1px #ffffff, inset 1px 1px #0a0a0a, inset -2px -2px #dfdfdf, inset 2px 2px #808080'
  '.Input--invalid':
    color: '#DF1B41'
  '.Tab, .Block, .PickerItem--selected':
    backgroundColor: '#dfdfdf'
    boxShadow: 'inset -1px -1px #0a0a0a, inset 1px 1px #ffffff, inset -2px -2px #808080, inset 2px 2px #dfdfdf'
  '.Tab:hover':
    backgroundColor: '#eee'
  '.Tab--selected, .Tab--selected:focus, .Tab--selected:hover':
    backgroundColor: '#ccc'
  '.PickerItem':
    backgroundColor: '#dfdfdf'
    boxShadow: 'inset -1px -1px #0a0a0a, inset 1px 1px #ffffff, inset -2px -2px #808080, inset 2px 2px #dfdfdf'
  '.PickerItem:hover':
    backgroundColor: '#eee'
  '.PickerItem--highlight':
    outline: '1px solid blue'
  '.PickerItem--selected:hover':
backgroundColor: '#dfdfdf'theme: 'night'
variables:
fontFamily: 'Sohne, system-ui, sans-serif'
fontWeightNormal: '500'
borderRadius: '8px'
colorBackground: '#0A2540'
colorPrimary: '#EFC078'
colorPrimaryText: '#1A1B25'
colorText: 'white'
colorTextSecondary: 'white'
colorTextPlaceholder: '#727F96'
colorIconTab: 'white'
colorLogo: 'dark'
rules:
'.Input, .Block':
backgroundColor: 'transparent'
border: '1.5px solid var(--colorPrimary)'Stripe Payment Intent configurations
Stripe Payment Intent is an essential component in the Stripe API that is designed to handle the checkout process securely. It ensures a smooth payment experience by managing payment confirmations and tracking complex fulfillment processes. Below are various configurations you can use to customize the PaymentIntent to suit different use cases.
Basic Configurations
Description: Optionally includes a description of the payment, which can be useful for record-keeping.
Confirmation Method: PaymentIntents can be confirmed using either the 'automatic' or 'manual' method. The 'automatic' method confirms the payment intent as soon as it's created, whereas the 'manual' method requires you to confirm it explicitly.
Capture Method: This determines when the funds will be captured from the customer's account. The 'automatic' capture method captures funds immediately after the customer authorizes the payment, while the 'manual' method allows you to capture funds up to seven days after the customer authorizes the payment.
Metadata: Add a set of key-value pairs to include additional information with the PaymentIntent for custom processing needs.
Here is an example of the basic configurations:
description: "Sample Payment Intent"
confirm: true # Automatically confirms the payment
confirmation_method: "automatic" # or "manual
capture_method: "automatic" # or "manual"
metadata:
  order_id: "12345abc"
Payment Methods
Payment Method Types: Stripe supports various payment methods, including credit cards, Alipay, SEPA Direct Debit, and many others. You can specify the types of payment methods you want to accept by setting the payment_method_types field.
Payment Method Details: Contains the details of the payment method used in a PaymentIntent, which can be card information, bank account for direct debits, among others.
Here is an example of the payment method types:
payment_method_types:
  - 'card' # Credit and debit cards
  - 'alipay' # Alipay
  - 'sepa_debit' # SEPA Direct Debit
  - 'bacs_debit' # Bacs Direct Debit
  - 'ideal' # iDEAL
  - 'sofort' # SOFORT
  - 'giropay' # Giropay
  # ... and more
Recurring Payments
Setup Future Usage: If you intend to charge the customer’s card at a later date, you should use the setup_future_usage field. This prepares the customer’s payment method for future payments and is especially useful for recurring transactions.
Off-session: Use off_session for payments expected to be made on a recurring basis, such as subscription-based or invoice payments. This signifies that the customer is not actively participating in the payment session.
Here is an example of the payment method types:
setup_future_usage: "off_session" # Indicates it's for future transactions
receipt_email: "[email protected]" # The email address to send the receipt
Complex Configurations
- Transfer Data: For those using Stripe Connect, you can employ PaymentIntent to perform direct charges on behalf of connected accounts. By using the
transfer_datafield and specifying thedestination, you can direct funds to a connected account. - Transfer Group: This feature allows you to group a set of transactions. This is particularly handy for complex business models like crowdfunding platforms, where a single payment may need to be distributed among multiple recipients.
Here is an example of the complex configurations:
transfer_data:
  destination: "acct_XXXXX" # The account ID of the connected account to which the funds should be transferred.

transfer_group: "group_XXXXX" # A unique identifier to group a set of transactions.
Please note that this is just an overview of some of the configurations available with Stripe PaymentIntents. Depending on your specific use case, there might be additional configurations that are more relevant. Additionally, Stripe frequently updates its features and capabilities. Therefore, it is always a good practice to consult the official Stripe documentation for the most up-to-date information.
In conclusion, integrating Stripe with Drupal's Webform module unlocks an array of online payment possibilities by combining the robustness of Drupal with the reliability of Stripe's payment processing. This simple yet powerful integration will empower your website to handle transactions with flexibility and customization, creating a seamless and efficient payment experience for your users.